This tutorial will give you more of an understanding of coding
@ Just a little preference, at the top of the properties box there are these 2 buttons
 all these do is change the way you view the items in the properties box; either catagorised or alphabetical.
Now lets get into coding
1) Open up the toolbox
 and drag onto your form a listbox and a textbox, in the listboxs properties there will be this
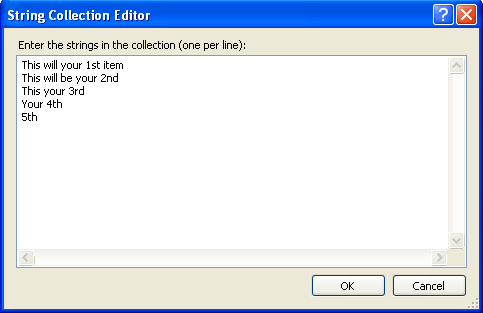
click its little button on the right.
Another window will now appear, each line is another item, so add a load of text it before clicking OK
2) Double-click the listbox and it will bring you to its default handle, _SelectedIndexChanged
First of all I will tell you how to make it so when you select a different item in the listbox, the textbox displays it. Add the following code:
Code: Select all
TextBox1.Text = ListBox1.SelectedItemA nifty little feature the Visual team has added is a dropdown that appears when writing code
For instance, under the code i just gave you put:
Code: Select all
ListBox1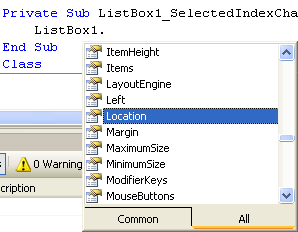
Next to each item is a little picture, heres some and what they mean:
 means that if you put a dot after it another dropdown would appear meaning you can put more coding after that.
 means that if it is followed by a dot it will have continuous dropdowns coming up if u keep selecting the same option
 means that it is a true/false statement so instead of being followed by a dot it should be followed by ' = true/false'
 means that it must be followed by brackets (), when you put the 1st bracket a little message will pop up giving you information of what to put it the brackets, for example
This is telling me to put in an integer (a whole number like 1, 2, 3, 4 etc) and the app will then check if the listbox item at that number is selected or not. Some code take 2 or more arguments like the messagebox
make sure your code once again just looks like this:
Code: Select all
TextBox1.Text = ListBox1.SelectedItemCode: Select all
MsgBox
These are the optional things you can also add to the messagebox, 1st off you put in what text it will show:
Code: Select all
MsgBox("Put your text here"The next part is the title so just put something like "Title"
And finish it off with an ending bracket, so it should look something like this:
Code: Select all
MsgBox("Put your text here", MsgBoxStyle.Information, "Title")Declaring
Now its all fine and dandy to drag a listbox on, but it is also possible to create one using code, creation is simple and only requires 1 line of code, start a new project and add a button to the new form, put inits _Click handle:
Code: Select all
Dim NewList As New ListBoxNow, we will have to add a couple more things, for instance the size and location. To change the size simply add:
Code: Select all
NewList.Size = New Size(268, 212)Code: Select all
NewList.Top = 12
NewList.Left = 12Code: Select all
Me.Controls.Add(NewList)So your final code should look like:
Code: Select all
Dim NewList As New ListBox
NewList.Size = New Size(268, 212)
NewList.Top = 12
NewList.Left = 12
Me.Controls.Add(NewList)An alternative to the code above is by using the 'with' command
Code: Select all
Dim NewList As New ListBox
With NewList
.Size = New Size(268, 212)
.Top = 12
.Left = 12
End With
Me.Controls.Add(NewList)Well thats all for now, I may write up another tut, depends on how many replies i get